


Hey there! If you're looking to spruce up your indoor space, installing a glass railing can be a game - changer. I'm a supplier of indoor glass railings, and I've seen firsthand how these elegant additions can transform a room. In this blog, I'll walk you through the process of installing an indoor glass railing, step by step.
Step 1: Planning and Design
Before you even start thinking about installation, you need to have a clear plan. First off, measure the area where you want to install the glass railing. Whether it's for a staircase, balcony, or around a mezzanine, accurate measurements are crucial. You'll want to note the length, height, and any angles involved.
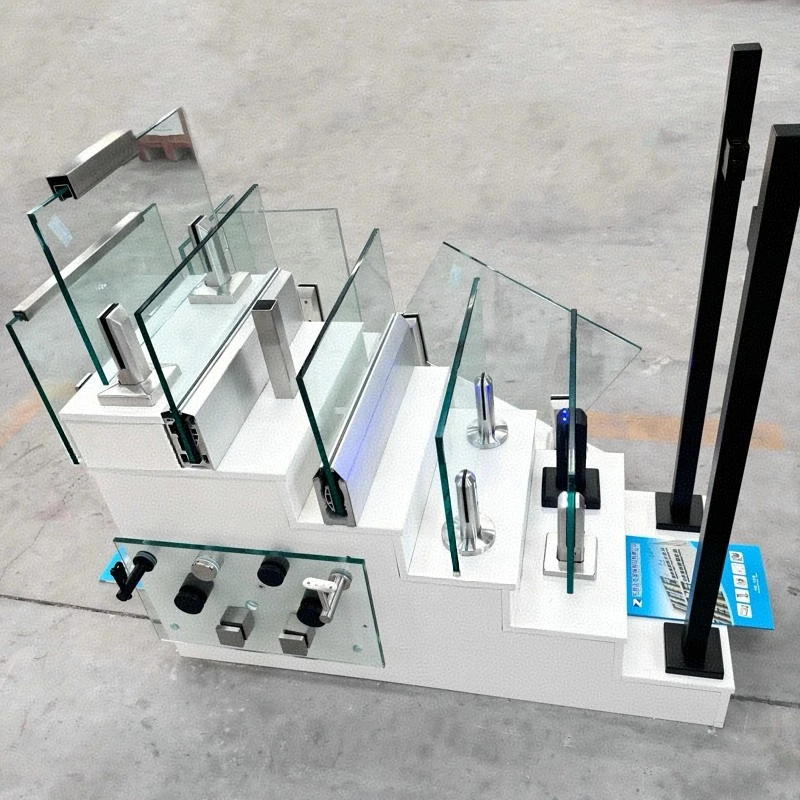
Think about the style you want. There are different types of glass railings, like Interior Glass Stair Railing, which gives a sleek and modern look to your stairs. If you're going for a more classic feel, Glass Balusters for Stairs can be a great option. You also need to decide on the type of glass. Tempered Glass Stair Railing is a popular choice because it's strong and safe.
Step 2: Gathering Materials and Tools
Once you have your plan in place, it's time to gather all the materials and tools you'll need. For the glass railing itself, you'll need the glass panels, posts, brackets, and any hardware required for installation. Make sure to choose high - quality materials. After all, you want your railing to last.
As for tools, you'll need a drill, screwdriver, measuring tape, level, and a glass cutter if you need to make any custom cuts (although it's usually best to get pre - cut glass). You might also need a saw for cutting the posts or brackets to the right length.
Step 3: Preparing the Installation Area
Before you start installing the railing, you need to prepare the area. Clean the surface where the posts will be attached. If it's a wooden surface, make sure it's smooth and free of any splinters. For a concrete surface, you might need to use a masonry drill bit to create holes for the posts.
Mark the locations where the posts will go using your measuring tape and a pencil. Use a level to ensure that the marks are straight and level. This step is super important because if the posts aren't installed correctly, the whole railing will look off.
Step 4: Installing the Posts
Now it's time to install the posts. Start by attaching the brackets to the posts according to the manufacturer's instructions. Then, place the posts in the marked locations and secure them using the appropriate hardware. If you're using a concrete surface, you might need to use concrete anchors.
Use a level to make sure the posts are perfectly vertical. This might take a bit of adjusting, but it's worth it to get a professional - looking installation. Once the posts are in place, double - check that they're secure and won't wobble.
Step 5: Installing the Glass Panels
After the posts are installed, it's time to install the glass panels. Carefully lift the glass panels and place them between the posts. Some glass railings use clips to hold the glass in place, while others might have channels in the posts where the glass fits.
Make sure the glass panels are centered and level within the posts. If you're using clips, tighten them just enough to hold the glass securely without cracking it. If you're using channels, make sure the glass slides in smoothly.
Step 6: Finishing Touches
Once the glass panels are installed, you can add any finishing touches. This might include adding end caps to the posts or applying a sealant around the edges of the glass to prevent moisture from getting in.
Take a step back and look at your installation. Make sure everything looks good and that there are no loose parts or gaps. If you notice any issues, now is the time to fix them.
Step 7: Safety Checks
Before you start using the glass railing, it's important to do a safety check. Give the railing a gentle shake to make sure it's stable. Check the glass for any cracks or chips. If you find any issues, don't use the railing until you've fixed them.
Also, make sure the railing meets all local building codes and safety regulations. This might involve checking the height of the railing, the spacing between the posts, and the strength of the glass.
Troubleshooting
Even if you follow all the steps correctly, you might run into some issues during the installation process. Here are a few common problems and how to solve them:
- Post not level: If a post isn't level, you can try adjusting the hardware or shimming it until it's straight.
- Glass panel won't fit: If the glass panel doesn't fit properly, double - check your measurements. It might be that the posts are too far apart or too close together. You might need to adjust the post positions.
- Loose hardware: If you notice any loose hardware, tighten it immediately. Loose hardware can compromise the safety of the railing.
Why Choose Our Indoor Glass Railings
As a supplier of indoor glass railings, I can tell you that our products are top - notch. We offer a wide range of styles and options to suit your needs. Our glass is of the highest quality, and we use durable hardware to ensure that your railing lasts for years.
We also provide excellent customer service. If you have any questions during the installation process, our team is here to help. We can offer advice on everything from choosing the right style to troubleshooting any issues you might encounter.

Contact Us for Your Glass Railing Needs
If you're interested in purchasing an indoor glass railing, I'd love to hear from you. Whether you're a homeowner looking to upgrade your space or a contractor working on a project, we can provide you with the perfect glass railing solution. Just reach out to us, and we'll work with you to find the best option for your needs.
References
- General knowledge and experience in the indoor glass railing industry.
- Manufacturer's installation guides for glass railing products.


